A long time ago I designed a temperature controller around the Raspberry Pi computer board. For my first design I put too many components in too small of an enclosure (8"x6"x2") and the thing basically fried itself before the first batch of beer. (Turns out Rasperry Pi’s don’t like getting touched by 120V AC lines…) My second design was basically the same but I used a larger enclosure that let me better separate the 120v relays from the digital parts. That’s been my workhorse for a few years now, but it has one fatal flaw. The Raspberry Pi relies on an SD card, which can’t take as many write cycles as a linux distro dishes out. So, unless I remembered to replace the SD card before it wore-out, the controller would just crash without warning every 4-6 months. Usually the night after I brewed a beer. 
For my THIRD controller, (boringly named “Mark 3,”) I decided to start over completely. The brain of the controller is an Arduino Nano. NOT another Pi.
I also decided to use relays that were basically designed for “makers” called PowerSwitch Tail’s. They’re basically just plugged inline and can be controlled directly by a 3.3v “GPIO” line from the Arduino.

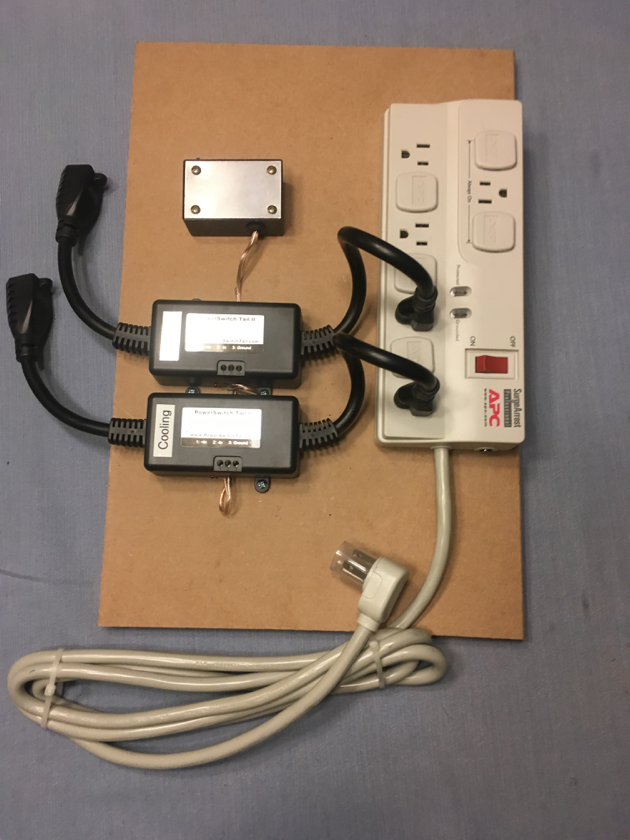
I should be able to use the same relays regardless of how many times I decide to rebuild the electronics. 
For the arduino, it has just enough horsepower to scan about 5 temperature probes once a second. I plan on three, one to measure ambient room temp, one to measure air temp in the freezer, and one physically attached to the beer.
I wrote a couple programs that run on a PC connected by USB that can read and log the temperatures, as well as control the settings. Once set though, the Arduino can run without the computer. So if the computer crashes or gets turned off, the beer is safe.
There are so many cool parts designed to work with Arduino’s, that I went full-nerd. I added a 128x32 pixel OLED display to show the current temperatures, a battery-backed clock chip, that also has nonvolatile RAM which I use for storing settings, and even a bank of NeoPixel lights, just to take the nerd-factor to 11. (Red when heating, Blue when cooling, Green when Idle.)

Remember, I said my original controller design was a failure, because I packed components too tightly? Well, all the circuitry I assembled was designed to fit in an Altoids Tin. Yup ALTOIDS! All the tin needed was a little Dremel work to cut holes for the USB connector, and the connectors for the power adapter, the temp probes, and the relays. I also lined the inside of the Metal case with insulating tape. Printing and gluing a label hid the tool marks and provided the finishing touches.
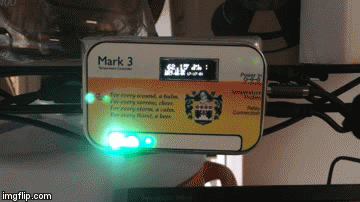
Sorry for the J. J. Abrams lens flair; phone cameras…

