I have been brewing with coolers and a converted keg since I started. I want to upgrade to an automated system (or at least partially). I looked into Sabco’s set up but am too cheap to pull the trigger. Also, spent some time looking at Morebeer’s structures. I would like to keep it at a single level as i am on 2nd shoulder surgery in 6 months. Any ideas or thoughts? I could put my own together but would have to hire any welding done as the world is a much safer place with me not welding.
If you’re batch-sparging, you can get away with one pump (since you drain the MT, then re-fill). If you don’t want to weld, or pay someone to do it for you, check out unistrut - it’s like an Erector set on steroids.
I’ve built 3 single tier brewing structures so far. My current one is built from aluminum bosch framing material, which was wonderful to work with, but had it not been free I may not have done it. You can always use slotted steel, which is bolted together.
Don’t knock the cooler just yet. I think they are still the most widely used, and for a reason. You can build a single tier with a tipping mash tun cooler with a little ingenuity. Mine is an insulated keg-tun and it tilts because I got tired of muscling around a full tun of grain.
Simple plumbing, brass QD’s, a couple of burners, one pump, and a cart. It doesn’t have to be complicated (like mine), just functional. Plus, you can always add on to it as you go. Mine is a bit much to some people, but like I said, it’s the culmination of years of brewing and knowing what I want.
I have a three tier, gravity fed, 5 gallon system from More Beer - Got it about 13 years ago, brewed 100’s of batches on it - have never had a single problem with any part of it, and best purchase I ever made in relation to brewing. I refitted my to use natural gas instead of propane tanks and now brew in my basement off of household gas line. Have considered going to their 10 gallon “tippy-dump” system, but can’t quite justify dropping 3K+ when the one I have still works the same as the day I bought it. But, their systems are top notch from my experience.
Shadetree pretty much describes my system (see below). I built it from a re-purposed factory cart that I got at a surplus yard. I had a friend weld the burner frames that drop into the top of the cart and weld in some unistrut braces that also serve as the mounting system for water pipes, electrical conduit, and gas lines. The kettles on the cart are my HLT and BK. I batch sparge with one pump and a couple high-temp hoses with brass QDs. I use a separate small cart to hold whichever of my two cooler MLTs (28qt or 60qt) I’m using.

Thanks for sharing. Probably this is why I keep researching as the options are limitless. I think the hardest part is when people say they make their set up they way they want because I haven’t had experience on these systems. A local small micro that brews great beer started and brewed on the Sabco. To be clear not mocking coolers but want something more…sadly just not sure yet.
I will take a closer look at Morebeer. Thanks again gentlemen.
"A local small micro that brews great beer started and brewed on the Sabco. "
I see you are from SE Minn. Wouldn’t be talking about Toppling Goliath would you?
Shadetree pretty much describes my system (see below). I built it from a re-purposed factory cart that I got at a surplus yard. I had a friend weld the burner frames that drop into the top of the cart and weld in some unistrut braces that also serve as the mounting system for water pipes, electrical conduit, and gas lines. The kettles on the cart are my HLT and BK. I batch sparge with one pump and a couple high-temp hoses with brass QDs. I use a separate small cart to hold whichever of my two cooler MLTs (28qt or 60qt) I’m using.
[/quote]
I love your setup. Easy to move and store. Now I must find one of those carts. ![]()
Shadetree pretty much describes my system (see below). I built it from a re-purposed factory cart that I got at a surplus yard. I had a friend weld the burner frames that drop into the top of the cart and weld in some unistrut braces that also serve as the mounting system for water pipes, electrical conduit, and gas lines. The kettles on the cart are my HLT and BK. I batch sparge with one pump and a couple high-temp hoses with brass QDs. I use a separate small cart to hold whichever of my two cooler MLTs (28qt or 60qt) I’m using.
[/quote]
I love your setup. Easy to move and store. Now I must find one of those carts. ![]() [/quote]
[/quote]
Yeah - easy to move and store. The vertical “mast” comes off with removing just a couple stainless bolts and loosening a union in the water line. Taken apart, the whole works will fit in my 2006 Toyota Highlander with the rear seat folded down. The critical dimension on my cart was the 24" width so that it would fit through the door on the back of my garage that goes to the patio I brew on.
Do a little measuring and thinking, then check out a good industrial surplus yard. There’s a good one nearby that I visit every month or so and check their website http://www.hgrinc.com regularly just to see what they have. I’ve found a few “diamonds in the rough” - I got my stir plate there for just $5.00!

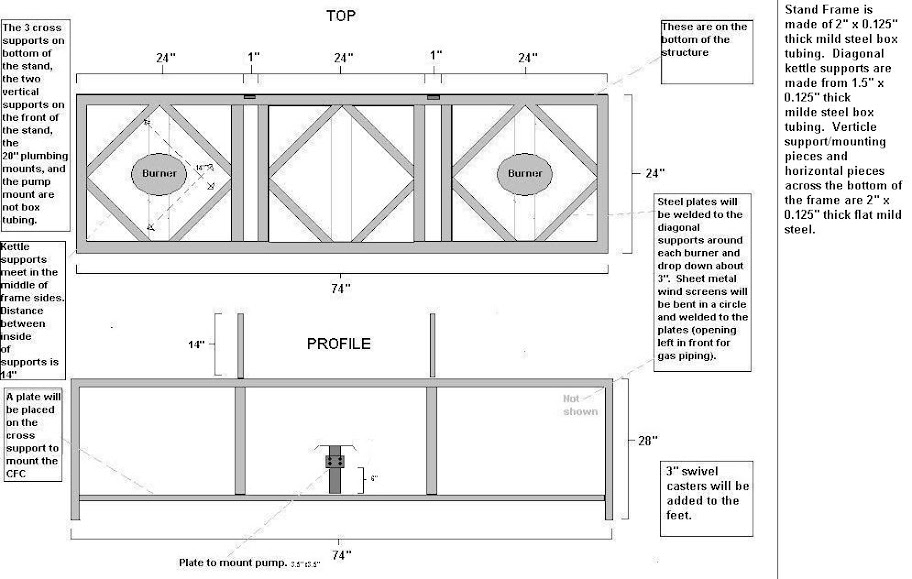
I just got done drawing up and having fabricated (by others) my second stand. It is a single tier stand where my other was 3-tier.
Start by getting the kettles and mash tun you want to use. After that, find a flat surface and lay out your top-down design on the ground using masking tape. Figure out what you need to support what you have and allow enough room for upsizing to as large as you can imagine wanting.
Take your measurements carefully and write it all down. Then draw something up on MS Paint or, if you want to get fancy, Google SketchUp. Put everything down on paper and don’t leave anything for later that has to be welded (since you don’t weld). Next, get your burners and figure out how you will attach them and the gas plumbing, i.e., burner attached to the stand, pipe attached to the burner, or vice versa. Take it all to the welder. Take your pump, too. That way, they can figure out the mounting template and fab a cover for it. You’ll need to decide what you want the stand constructed out of. I went with 2" square tubing because it was only $100 more than 1.5". I went with 0.125" thick because “when in doubt, make it stout.” This is extreme overkill and I couldn’t be happier. I opted for mild steel because they wanted too much for stainless. YMMV.
Once you have everything ready, do a run through with just water. The pump is where it all lives or dies. Realize that you will need to add water to account for a false bottom versus a manifold or screen on a cooler. Realize that heat losses will differ. Get this all worked out before you put grain into the mix. I didn’t and it was a long first brew day.
For automation, I’ll leave it to the experts. I haven’t gone to that step yet. If I can get things right on my next brew without much scrambling, I may leave the automation off for a few years.
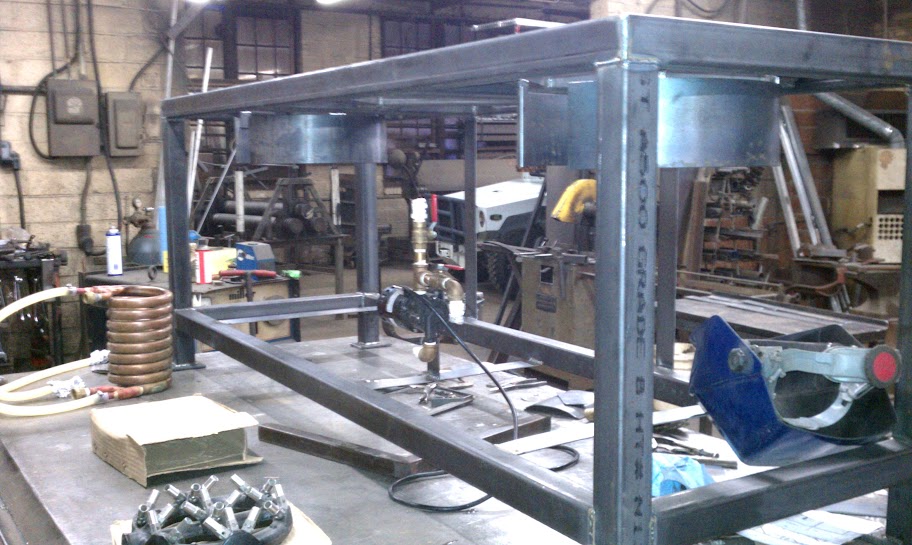
A few pictures. Some measurements on the original drawing may have changed. Size wise, everything fit well.
At the welder’s.
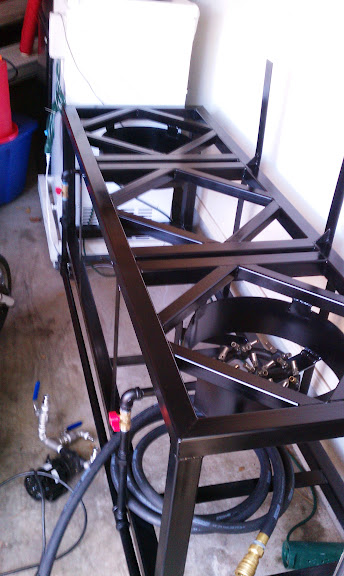
First paint job and before stainless plumbing. Had to redo the paint in gloss stove paint. The flat comes off on your hands too easily.

Gloss paint applied.
Waterproof switch for March Pump wired up.

All done … for now.

[quote=“Braufessor”]"A local small micro that brews great beer started and brewed on the Sabco. "
I see you are from SE Minn. Wouldn’t be talking about Toppling Goliath would you?[/quote
You are correct! Great place…had a few and bought a couple of growlers. I believe they brewed on that exclusively until they started growing. It was still there Saturday but now maybe they use it for small batches and test batches.
DCBC…thanks for posting…that is along the lines of what I am thinking. Great advice and plans!
No worries. Happy to help. Just know that there are potential growing pains going from the cooler to stainless. You quickly realize how good an option a cooler is for single step infusion mashes. I think I have the issues I ran into on the first batch overcome at this point, but it made for a very wee hours of the morning end of a brew day.
HGR Industrial Surplus as a whole, appreciates all the nice comments made by fellow users. Feel free to visit our website or stop in and visit our showroom anytime, we have something for everyone.