Sneezles, what are those horizontal flat bars for? Is the basket hanging by them?
Yes, it’ll hook onto the edge of the kettle… Sneezles61
Did you go with a large diameter hop basket to improve hop utilization? I think the obvious answer is yes…I’ve had little success with hops when using a cloth (cheesecloth) bag.
No… That was my first basket when I started BIAB in a keggle…
Hop pellets have alot of fine matter… You’ll plug up anything that tries to contain them… So a bit more of a course weave in the basket is good… You’ll still get trub… But not like just dumping them in free range… I’m happy with my whole set up… Just need to tweak my chillin’ aspect a bit…
Sneezles61
Looks just like the one I have. I’ll have to try it out next brew day.
@MikeBeer I’ve use 5 gal paint strainer bags for my boil hops forever. No issues whatsoever.
What tweak to your chilling is required?
I built a parallel counter flow chiller… It works fine, but it’s how the connections and thermometer are orientated… I’ll figure a way to hang it under the brew cart… Loosely… Should I need to pull it out for cleaning… Sneezles61
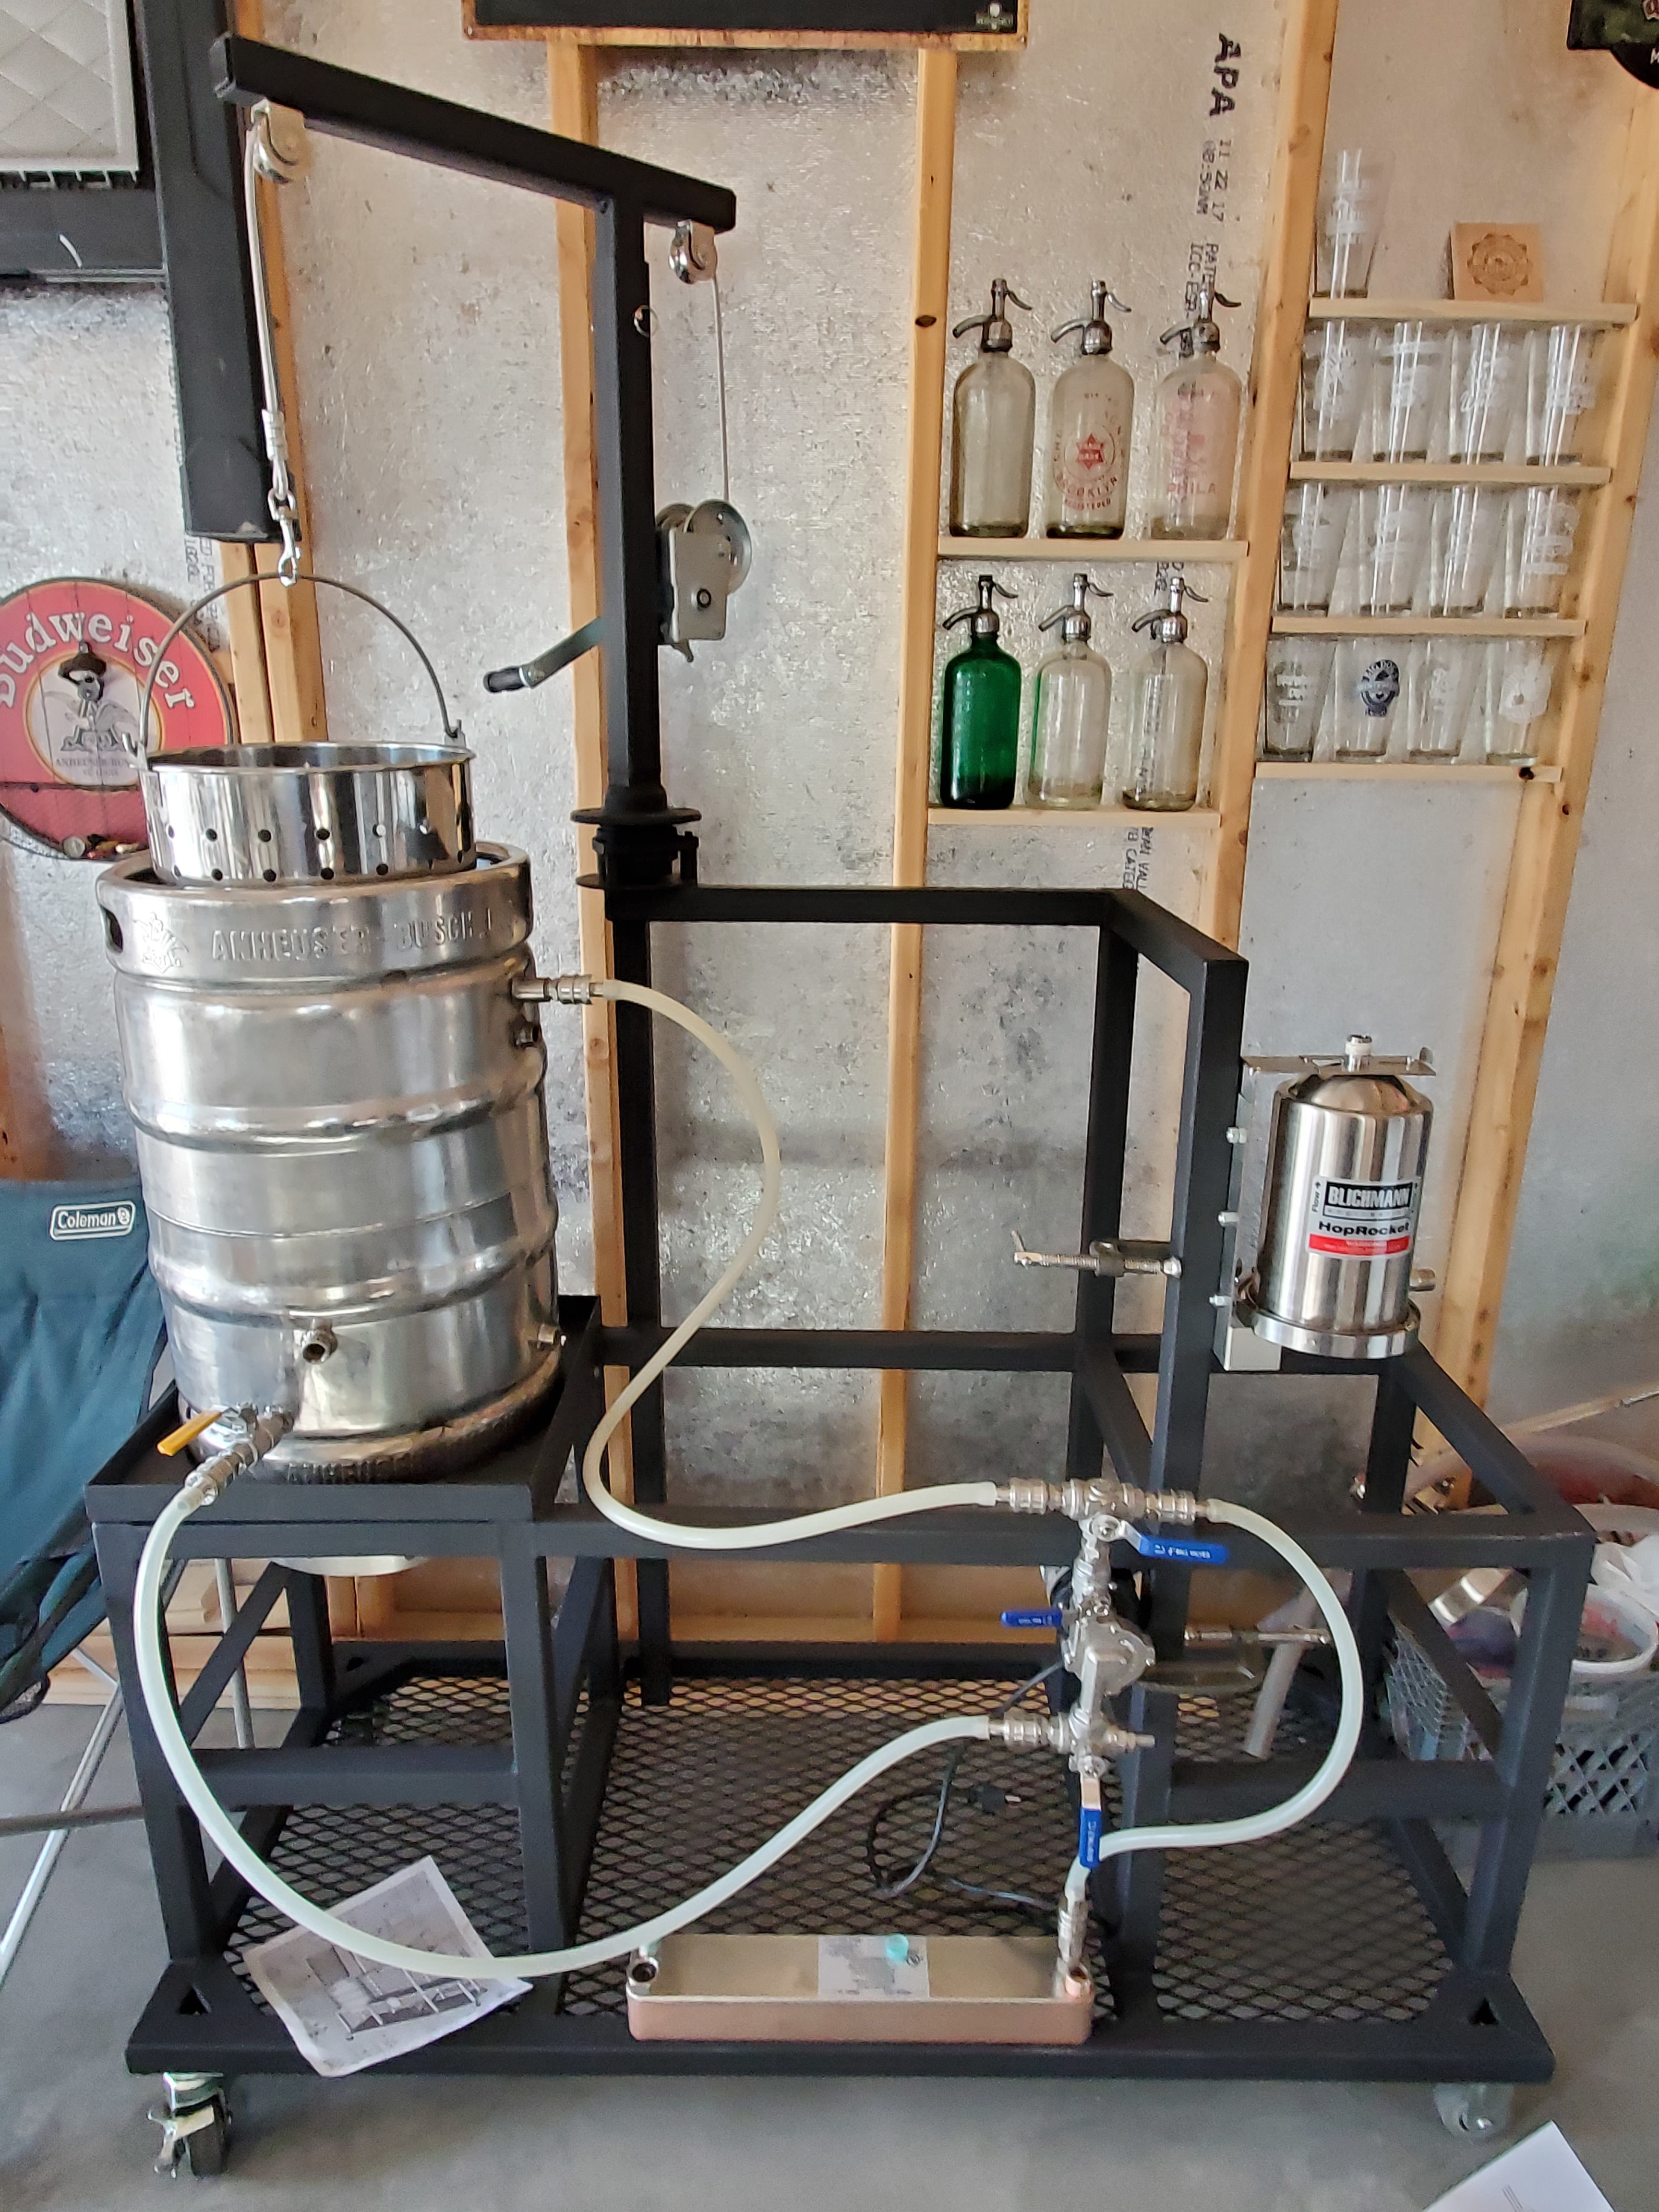
OK I’ve been doing other things but I’m back on this brew sculpture. Here is a mock up of my plumbing, what do you guys think? The hoses are temporary…I will trim them in length, and the hoses are connected for a recirculating mash with heat applied by the propane burner as required. I’ll have a thermometer in the mash. (I’ll work on using the Rocket later for adding heat…that is my long term plan) I’ll do a cold water test with this soon to see if the pump primes and everything generally works as it should. (Also, note that the strainer basket will be replaced with a custom SS mesh basket). This is, I think, a pretty straightforward setup and should work OK, but I’m asking anyway since this will be the first time I’ve used a recirculating pump. The output of the pump is facing up to eliminate trapping bubbles. I’m wondering if the pump is far enough below the keggle, and if the chiller is in a good location. Thanks in advance for any ideas, suggestions, potential problems you see.
All plumbing looks in order… Option here: put a Tee on the bottom of the mash-tun… Install a thermometer there to monitor your runnings… If you can stay 152*, you have enough wiggle room to adjust as you figure out “make it talk”…
And you have a hop rocket!!!
Sneezles61
Looks good! I’m sure you’re excited to get a brew day on it!
I stated my opinion and experience with mounting the pump that way above in the thread. Didn’t work well for me at all but YMMV. I would definitely put another T and ball valve on the output side to release the airlock.
I really like the hand crank hoist! That will come in very handy.
1 Like
Need a valve to release airlock.
1 Like
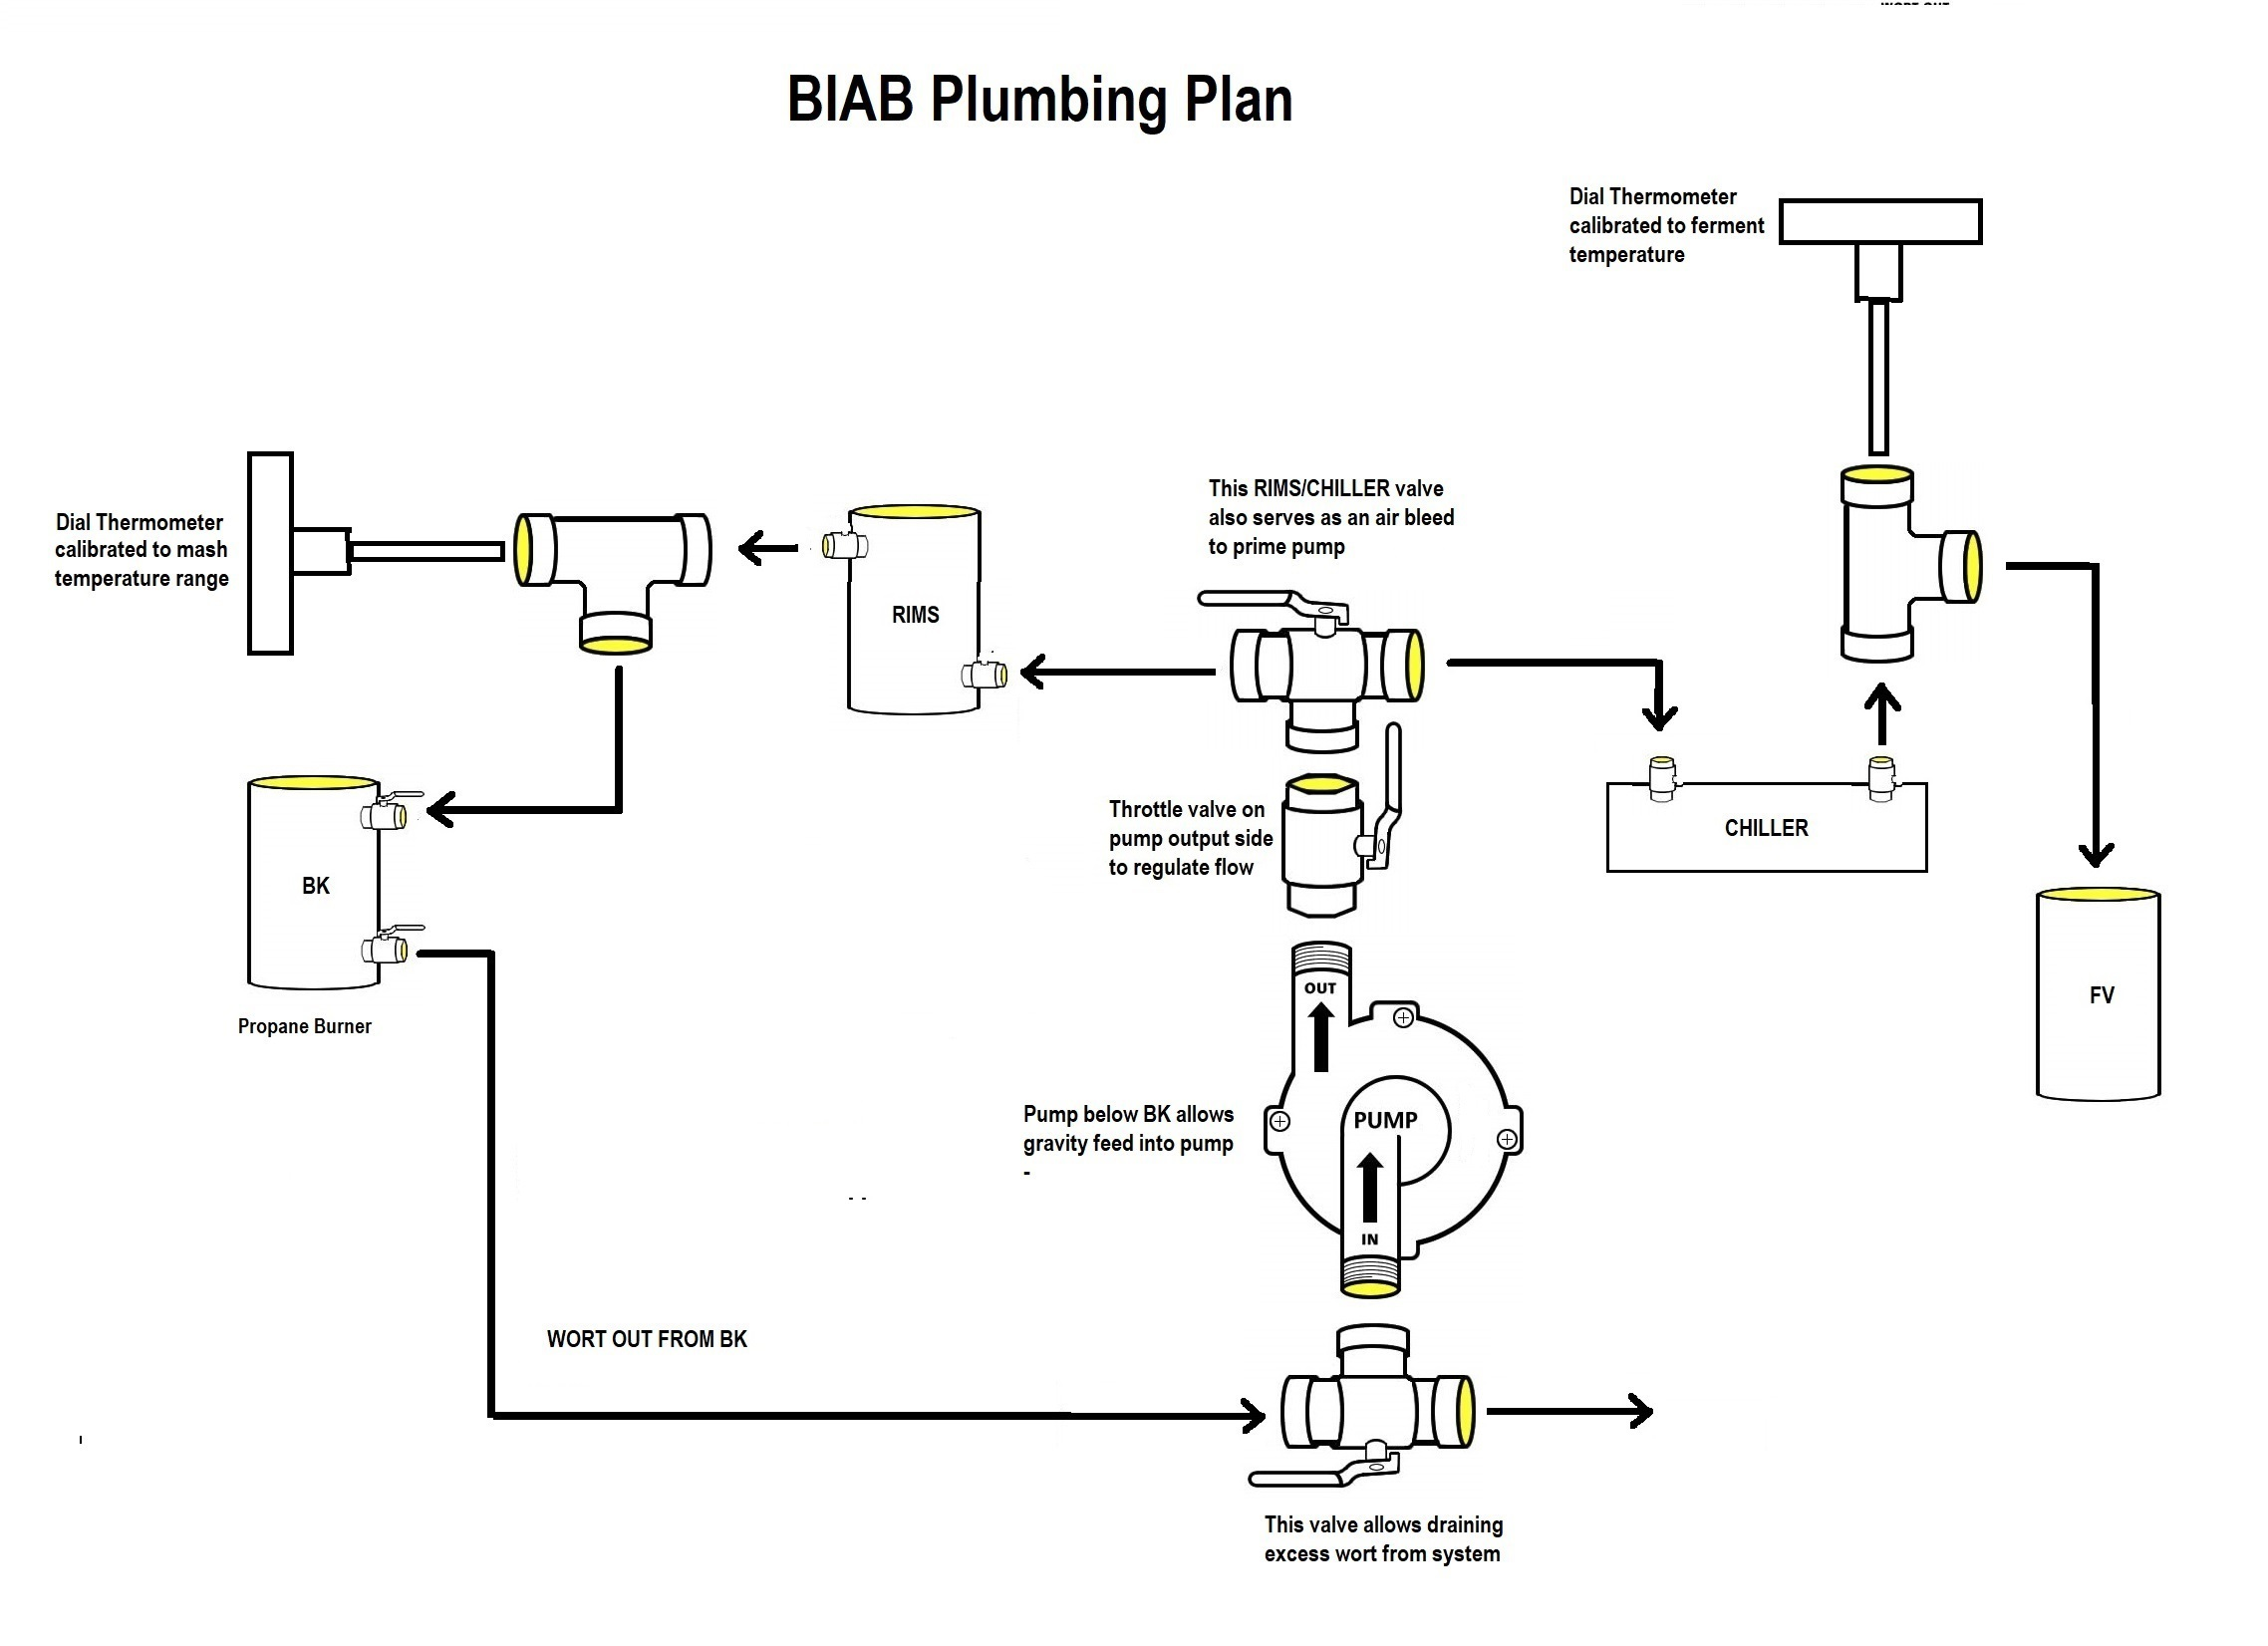
Where in this picture are you guys suggesting the Tee and ball valve? At the output of the RIMS/CHILLER valve? How and when would I use this valve, during priming? What exactly is this “airlock”? Thanks.
Three way valve directly on the pump outlet. Use it to bleed the air out of the pump head to prime it.
2 Likes
Replace the first valve off the output with a SS tee and run it with the ‘stem’ to one side (opposite of your 3 way valve). Use that ball valve on the output to act as a bleed valve on the stem.
I see now you plan on using the 3 way valve. How were you planning on doing that? Removing the tubing to the RIMS? If so that would open the loop and work.
2 Likes
Yep, replace your “throttle valve” with a 3 way and you’ve got it. When you open the valve on your kettle to begin pumping there will be air in the line, It will not get pushed out by gravity unless you give it an easy place to go. Your pump will cavitate and run dry. With the pump mounted this way that will happen every time without the “air bleed valve” and most times even with it in my experience.
1 Like
Monitoring the wort as it leaves the mash-tun is how I would/did do that… I believe that becomes real time temp… of course… I was always recirculating. Even before a pump… Open the valve, collect in a half gallon measure container and pour on top…
Sneezles61
My approach was to, as Loopie_beer stated, use the RIMS/CHILLER valve (see my component diagram) as an air bleed path to allow priming the pump. All my hoses have quick disconnect fittings, so when I am ready to start pumping I would temporarily disconnect the “recirculation” hose out of the RIMS/CHILLER valve (with the valve set for that direction of flow), which opens the path, and then open the keggle output valve. The liquid from the keggle should prime the pump because there is an air bleed path due to the temporarily disconnected hose. Then I would reconnect the hose and start pumping. Does anyone see an issue with that method?
Nope… And for what it’s worth… I don’t have an air bleeding setup on my pump… I just toggle the switch and its pumping…
Sneezles61
OK thanks Sneezles61, good point. I’ll do a dry run (actually wet run) with water and see if I have a pump priming issue, and dannyboy58 I’ll let you know if the pump orientation is an issue. Maybe it will all work fine as I have it set up.
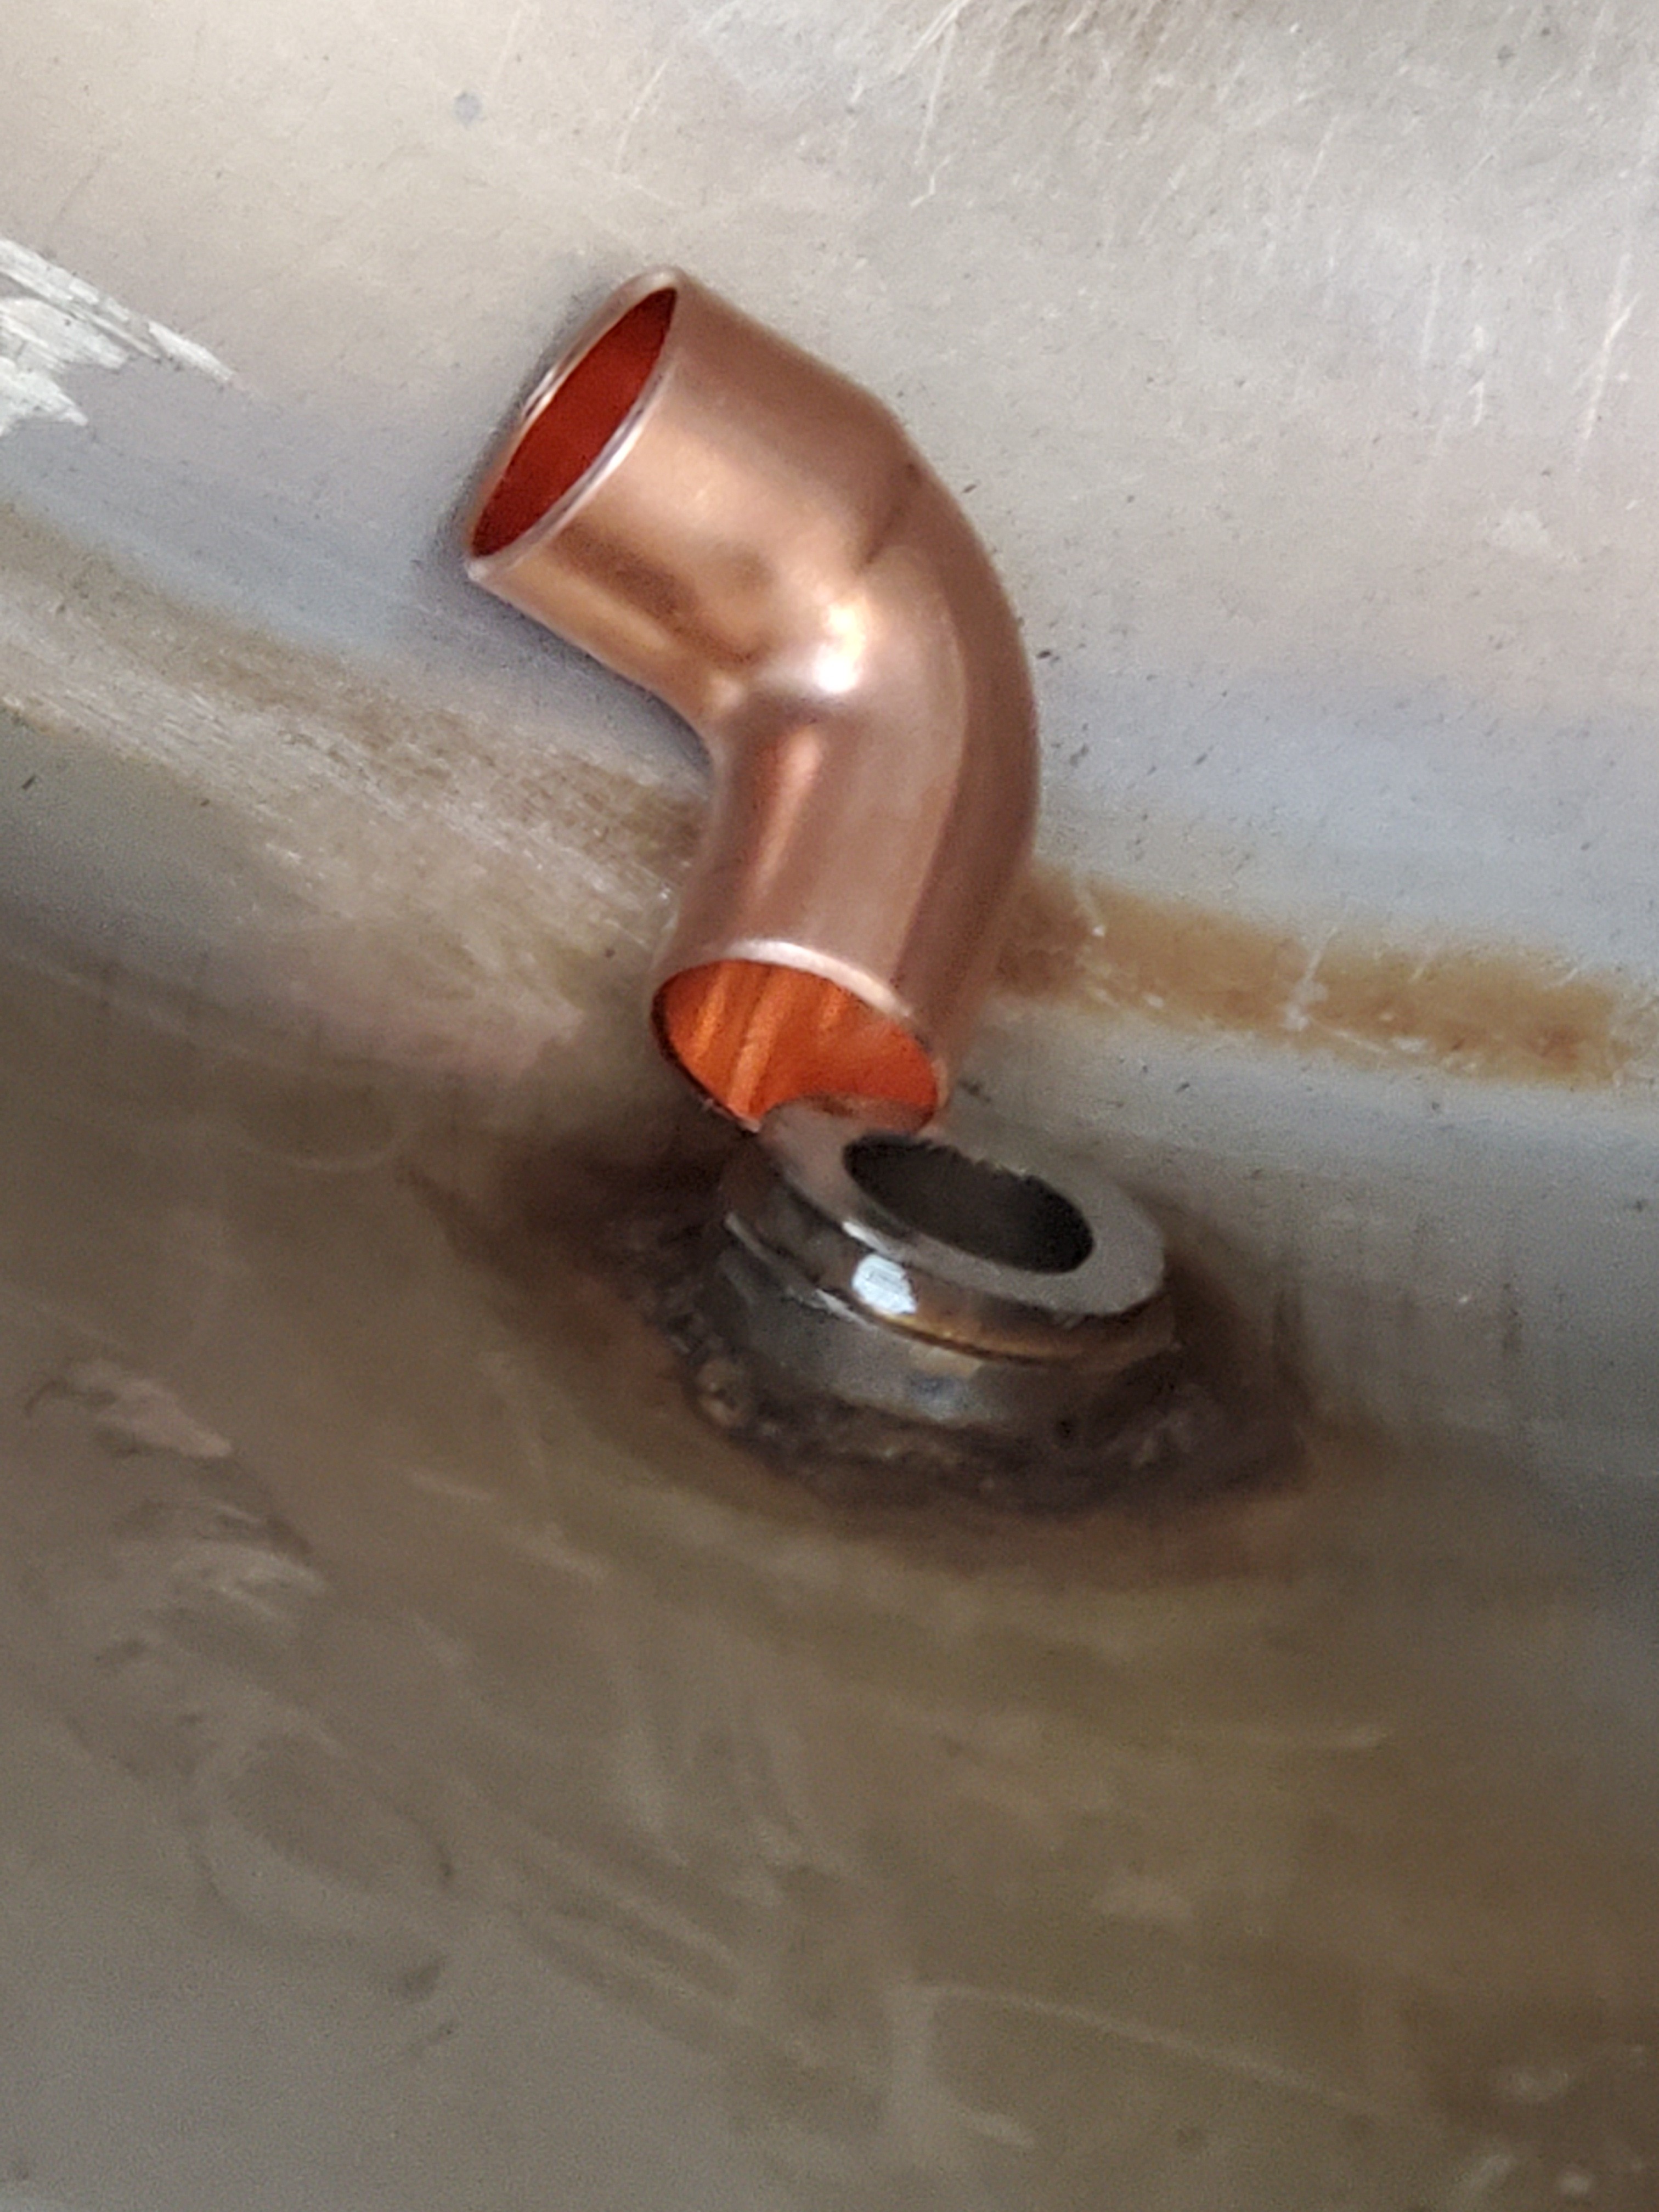
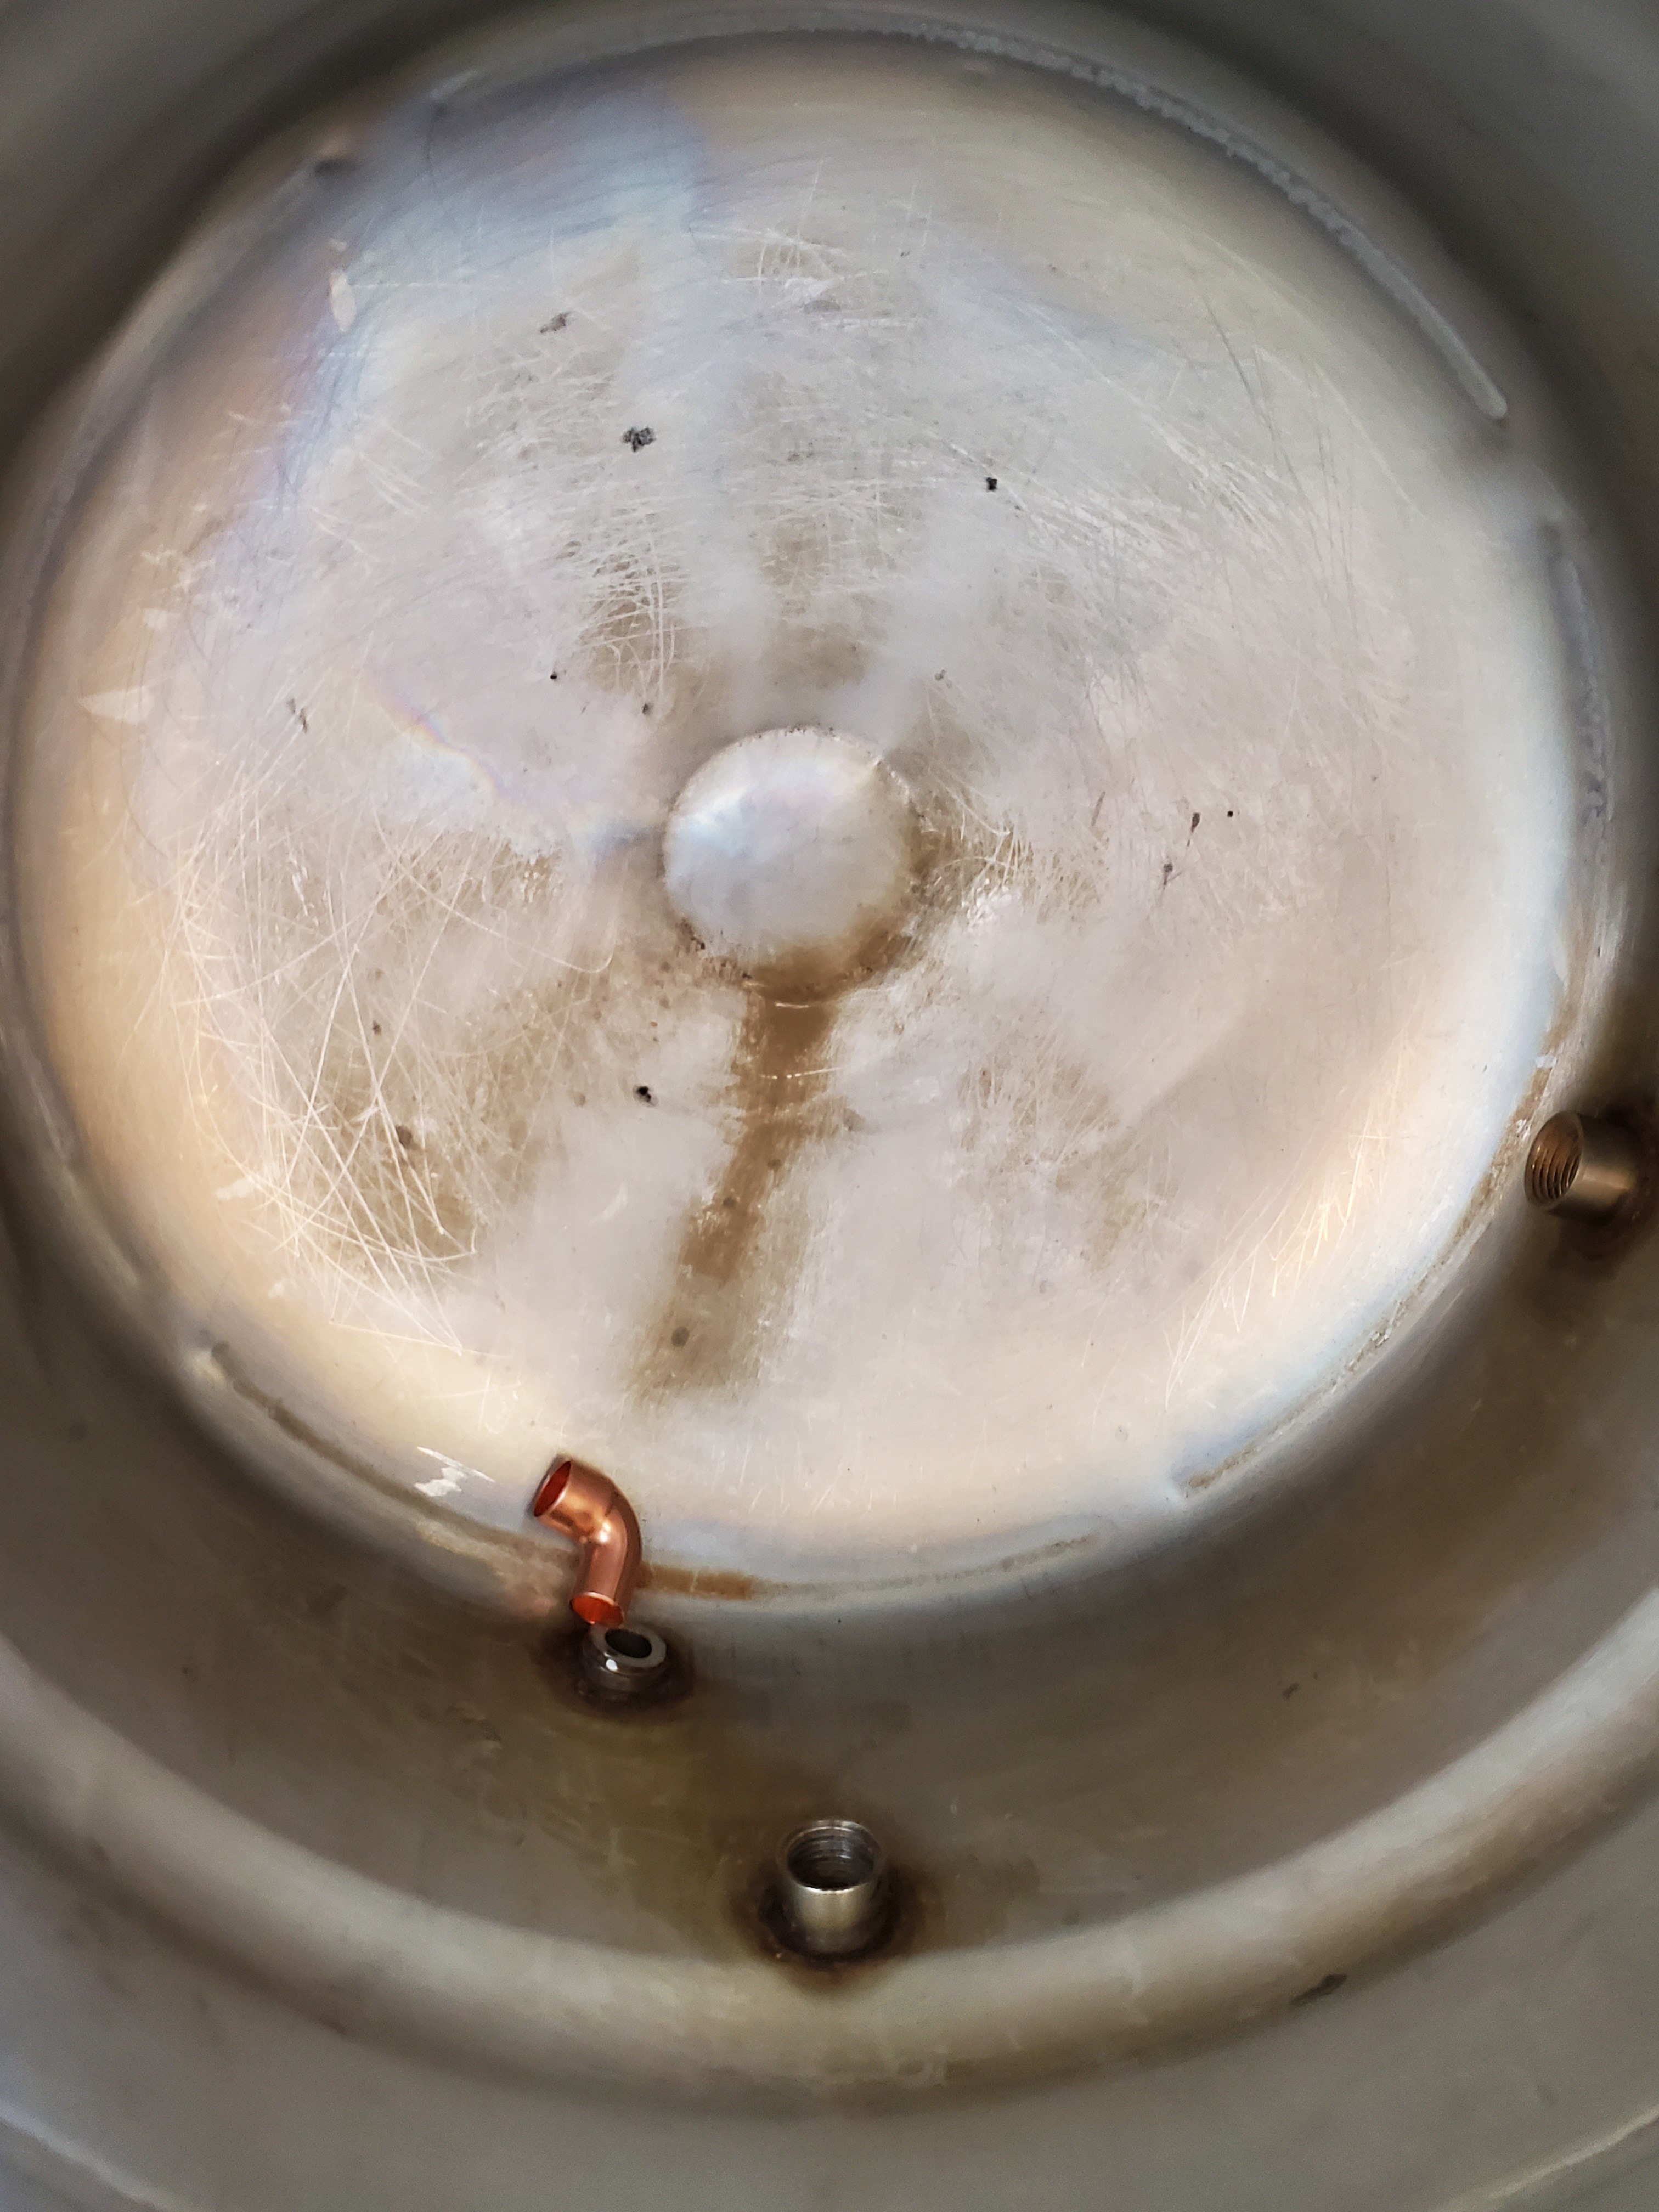
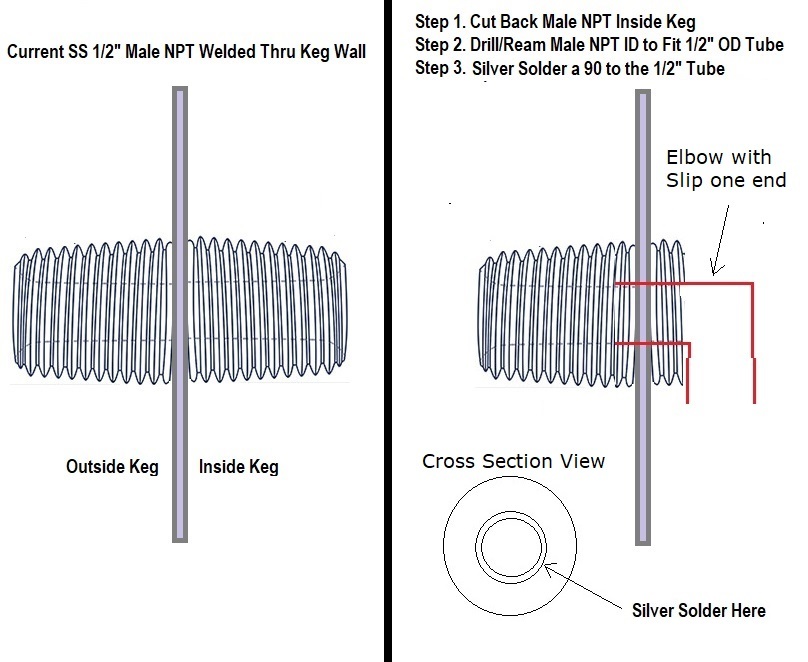
Now, on to my latest “problem”. Earlier in this thread I talked about how I was going to solve my dip tube / basket interference issue. I decided cut the 1/2" SS nipple (my dip tube connection) as close to the keggle interior wall as I could with a cutoff wheel, which is shown in the pictures. I already did that. Next I will drill out the inside of the nipple to allow inserting the copper elbow flush with the keggle interior wall, and I’ll silver-solder the elbow in place. I can then attach another copper elbow/tube to reach wherever I decided to put it, currently in the center of the keggle bottom is my goal. I can then remove and clean that elbow/tube as required. This is my dip tube design, and my goal is to minimize clearance to the keggle interior wall and also the bottom of the keggle. I have attached a diagram of what I am doing at the bottom.
However this leaves me with a question - will there be an issue with the copper soldered inside the nipple in terms of dissimilar metals, or the fact that copper and stainless steel have different expansion coefficients? Would the copper tend to separate over time due to the extreme temperature changes? Maybe I am overthinking this, but if anyone has experience with silver-soldering copper with stainless steel please chime in and tell me what you observed.
I am thinking I should look for a stainless steel elbow instead of copper, which should not pose any problems like copper would. Thanks in advance for your comments.
Here’s a good read in regards to your two different metals.
They make SS street elbows like that but I’m not sure if I have ever seen them without threads. You could get a SS street elbow and use attach it to an uncut nipple and run it from there.