When I bottled, room temp… but I think there are some new discussions about this now.
Sneezles61
You can carbonate at room temp. There is so very little fermentation that it won’t create and off flavors. Then pop them in the fridge to lager them.
Thank you, Thank you.
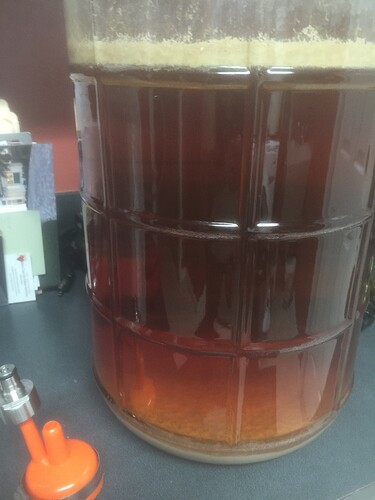
Things are looking good. The recipe OG target is 1.050. Mine was 1.049
My current SG sample (using hydrometer) at room temp is 1.012.
Recipe ABV is 5.1 so I’m getting close at 4.86
I am also looking to have it be as clear as possible.
Today started a 2 degree increase in temp and will repeat each day till 68 degrees and then rest for 3-4 more days.
Then I will transfer to secondary and lower temperature 2 degrees per day to 34 degrees and lager for 4 weeks. Then bottle and carbonate at room temperature.
Sound good?
I would go straight cold crash directly after yer 3-4 day at room temp… THEN rack off the trub and prime, bottle.
Snee
10-4 guys, thank you!
Jeff
1 Like
jfmerk sorry for delayed reply. Relative your temperature control. Its better to measure the temperature of the wort directly. Fermentation is an exothermic process which means it gives off heat. I have measured as much as a 15 degree higher wort temperature than the air temperature(5-10 more typical). You can directly measure the temperature with this device Stopper Thermowell. Either drill a hole in the fermenter lid for the stopper to fit, or buy a big mouth bubbler 6.5 Gallon Plastic Fermenter with Harness - Big Mouth Bubbler. If you go with big mouth bubbler, I would recommend a dual port lid and stopper to fit the hole in case you need a blow off line put in. Big Mouth Bubbler® Universal Lid - Dual Port
Also, its more cost effective to buy a freezer and turn it into a “refrigerator” with a controller like the inkbird. Refrigerators have a lot of bells and whistles which are expensive. Have the inkbird control the frig temperature and have the heater control system control the wort temperature with the heater you are using now. The reason I recommend not controlling the freezer temperature with the thermowell in the wort is that it makes for a long lag time. It takes a long time for the wort to cool and the freezer will over shoot and cool too much. Will have wide temperature swings. Don’t have this problem with the heater controls, at least the carbon fiber ones designed for brewing in that they are only 20-30 watts and don’t provide enough heat to over shoot.
No worries at all Mike, thanks for the feedback! I never would have thought to take some temp measurements to ensure I know an accurate wort temp. So I went out in the garage to take a temp reading
of the wort compared to the inkbird temp.
No BS here, 58 on the inkbird, 58.1 wort temp. ![]() I can only attribute that to the extensive insulation and sealing on the controller temp probe taped to the sided of the bucket. I used 3” rock wool insulation and I cut a 10”x10” pad to cover the probe and used a foil type duct tape around all the edges.
I can only attribute that to the extensive insulation and sealing on the controller temp probe taped to the sided of the bucket. I used 3” rock wool insulation and I cut a 10”x10” pad to cover the probe and used a foil type duct tape around all the edges.
I’ll definitely be moving to a freezer type setup you described along with upgrading from a bucket fermenter in the near future so I can brew a lager in the summer😎
Jeff
2 Likes
I have a freezer setup like mentioned above and use the taped and insulated method as well. I do drop the temperature incrimentally if im fermenting with an air lock to limit O2 intake. All my lagers are fermented under pressure with my CO2 outlet daisy chained to a keg so any suckback is CO2. I feel lagers are more sensitive to oxygen. That said I still drop the temp over a few days on the lagers as well only because with a temp controller why not
I like your daisy chain setup when fermenting under pressure…great idea.
For fermentation with airlock, I don’t think dropping the temperature slowly reduces the total air flowing back into the head space…it just slows the rate of draw back so you do not observe it. When you slowly lower the temperature, air can get sucked back in slowly through the small leaks in system or occasional bubble backs that you just do not see. PV=nRT. If you want to limit air blowback either get that balloon thingy (or your daisychain setup) or reduce the headspace in your fermenter (transfer from 6.5 gallon fermenter to purged 5 gallon fermenter) or purge your head space with carbon dioxide from a tank(the CO2 from tank cools due to expansion). The most effective way is the balloon thingy/daisy chain setup. The reduction in headspace reduces the back flow of air in proportion to the head space volume. Thus if you have 1/10 the head space you have reduced air blowback by a factor of 10. The cold carbon dioxide purge effectiveness I have not measured and its utility depends on the rate of purging which impacts how cold the gas gets, how quickly you cool the wort as the wort will heat up the headspace etc.
Slowly dropping the temperature especially when a lot of yeast is present in beer does have an advantage because it does not result in the yeast excreting lipids (off flavor) as covered pp 174 palmer4th ed.
2 Likes
I worry too much about O2 messing up a good brew. Therefore, I rack with CO2, cold crash with CO2…
But ifn I had a setup like Brew Cat, my worries would wane… Just sayin’.
Sneezles61
Do they sell a balloony thing ? Ive used just a regular ballon and poke a pinhole in it. Its my go to when doing fruit wine in a gallon jug or cider.
With the discussion of O2 suck back and my Atlantico Lager, Im using a bucket style fermentor and the standard airlock with a tablespoon of water in it. I’m thinking it must have a slow leak cuz I put just enough water in the air lock to fill the trap. During fermentation there wasn’t one bubble nor was there even a hint of pressure to make the liquid level uneven in the trap. 4 days in, I cracked open the lid to peak, saw the foam and closed the lid… massive fermentation/CO2 odor too.
I’m raising the temp 2 degrees per day and presently at 62. Assuming the lid is leaking, I don’t think I can really capture what little CO2 may be remaining and can’t prevent O2 suck back either.
I could transfer to a glass carboy after the rest period and make an air tight seal for cold crashing/lagering period???
Far less O2 head space in the carboy.
So now I’m curious about how big a deal is the O2 issue when I cold crash after my diacetyl rest? Is it a matter of having lousy beer vs a good beer or a good beer vs a great beer??
Thoughts? Thanks!!
Jeff
Rburelli mentioned equipment for the balloon thingy in a previous post. Here is the link Cold Crash Guardian - Oxygen-Reducing Cold Crash Blowoff System
video is here Cold Crash Guardian - Oxygen-Reducing Cold Crash Blowoff System
called the cold crash guardian.
I use a big mouth bubbler for fermentation and I think the 0.5 psi back pressure of the check valve might blow my lid off. Perhaps Rburelli can comment on this device nudge nudge hint hint in monty python speak ![]()
Here is a link to other methods for reduction of oxidation. 7 Methods For Reducing Cold-Side Oxidation When Brewing Beer | Brülosophy
short answer-don’t worry about it.
To answer your question fully, in my opinion its more of a case of great vs very good beer at best. Its more of a fine point. But in God we trust, everyone else bring data. This link shows the data for side by side comparison of sucked back without suck back…
not a statistically significant difference. For an american pale ale.
exBEERiment | Impact Sanitizer Suck-Back During Cold Crash Has On American Pale Ale | Brülosophy
You bottle your beer and don’t have CO2 tank so you are introducing oxygen when you bottle anyway (unless you use the special caps with oxygen scavenger in them.
Short answer ales especially dry hopped pretty much unavoidable. Lagers especially delicate lagers definitely do better if you can limit O2 at least IMO
I now use the cold crash guardian, not because I want clear beer, because I don’t really care about that as long as it tastes good……9 years into homebrewing I had never cold crashed….until last year.
However, now I do cold crash Uber hopped ales because it drops particulate matter out of solution and allows me to transfer from carboy to keg without clogging, which had become a problem with my big dry hopped West Coast IPAs.
1 Like
I would be careful with the airtight seal approach with a glass carboy, because the potential exists to create enough negative pressure to break the carboy. Also, when you open it back up, there will be an inward rush of outside air, potentially nullifying any benefit.
If you’re not in a hurry, most beers will drop clear given enough time. I had some crystal clear beers that never saw a cold crash….like this one:
2 Likes
Bottling…you WILL be doing a mini fermentation, which should consume O2… provided you aren’t agitating it too much…
That is where I wasn’t sure if Lagering after bottle priming was… well, Lagering… Need some kegs?
Sneezles61
Thanks everyone for the comments, feedback, pics and advice!
I’m feeling good to stick to the plan. I’ll skip the transfer to a carboy and sealing idea too.
One more question…
I’ve done a little more forum surfing and reviewed some of the notes from Northern Brewer on the Atlantico Lager. It seems the standard if pitching dry yeast, is to pitch two packs. Brad from NB says in general for lagers pitch twice the amount of ales. Lots of support on other forums for pitching two dry yeast packs for lagers. Yet the folks at NB sold me one for the recipe kit. Saflager W-34/70
Seven days into fermentation I was very close (1.012) to the target FG (1.011) and feel that I’ll be right on it after the increase in temperature and rest period.
Will I have enough yeast remaining to carbonate? I’ve read some folks make a little liquid yeast and add it when adding the priming sugar.
Thanks again to all !!
Jeff